Masks > Rectangle Method

Rectangle method
Lots of 3D mask tutorials will have you cut and sew an octagon shape, which requires a fair amount of precision. You can make a 3D mask by just sewing a rectangle and folding into shape.
Be sure to read “Before You Sew” to make sure you have the necessary materials. The tutorial that follows uses the dimensions I use for a mask that fits many teen-adult size faces, but the techniques can work for other sizes as well. This tutorial is provided for your personal use only. Fabric face coverings are not medical devices and I make no health claims.

Prepare the fabric
Pre-wash and dry your fabrics to remove any shrinkage.
Cut two rectangles of fabric 7¼” high by 10¼” wide.
Shown here is one exterior fabric with a different lining fabric, though you can self-line (use the same fabric for the inside and outside.) Place fabrics right sides (RS) together.

Stitch horizontal seams
With the rectangles RS together, stitch across the long sides using a 1/4” seam allowance. Back-tack at beginning and end of seams so they don’t come loose in next steps.

Press and turn out
Press seams as sewn, then turn the mask right-side out.
Press the seams completely open (running your fingernail along the seam can help.)
Flatten the mask with the seams at the top and bottom and press.

Turn raw edges to inside
Turn raw edges of short (open) sides of rectangle 1/4" to the inside and press.
The finished rectangle should be 6-3/4” high by 9-3/4” wide.

Fold top and bottom toward center
With the lining side up, fold and press the top and bottom toward the center, making a crease about 2” from the long seams.
This leaves a center section of 2-3/4”.
I use a gridded pressing surface for accuracy, but you can measure with a ruler or create a template for pressing.

Fold corners in
Open out the top and bottom flaps and fold in each of the four corners, lining up the horizontal edges of the triangles along the original crease lines.

Stitch channel for nose wire
Choose which side of your mask will be the top.
Open out the folds along the top edge of the mask and top stitch at whatever distance you need to fit the nose wire. (1/4” shown.)
You may top-stitch along the bottom edge if you choose. It can keep the lining from rolling to the outside and it looks nice, but it’s not necessary.

Insert nose wire
Trim the nose wire if needed so that it fits in the center section of the top edge (not extending into the folded-down corners), about 5-1/2” in this case, and slide into the channel. The folds keep the wire in place.
If you are using a shorter wire or other nose piece, you can stitch down either side of it to keep it centered in the channel.

Prepare for 3D fold
It’s the folding of the top and bottom flaps that makes the mask 3D.
Start out with the flaps folded back in toward the center.
(Some people edge-stitch along the horizontal top and bottom folds at this stage for structure, but I don’t bother. You can try both ways to see what you prefer.)
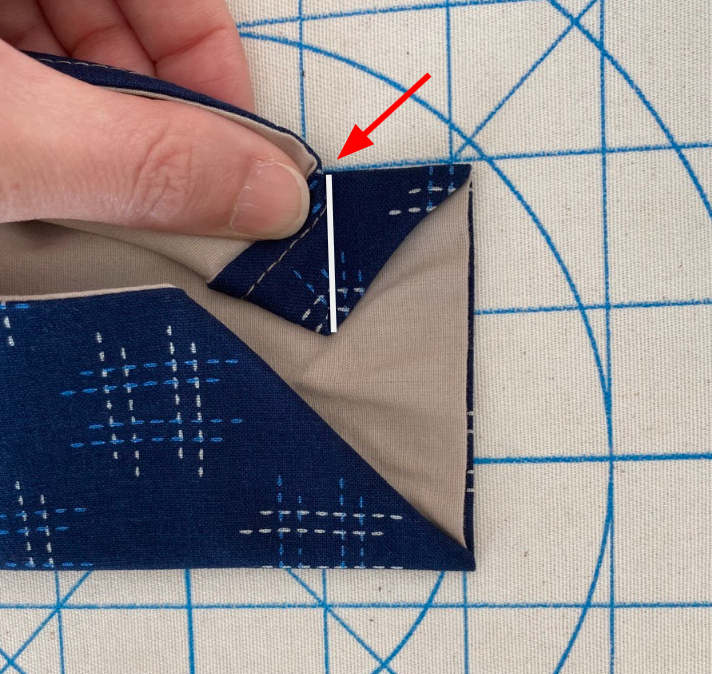
3D fold
Flip the edge of the top flap back over itself.
Then scoot the flipped-up portion toward the side edge of the mask, so that it’s parallel to the side, and the corner of the top edge lines up with the horizontal fold of the mask, as shown.

Secure the 3D fold
Secure with pins or clips and repeat with the bottom flap.
Then repeat on other side.
Using the dimensions given, the line formed by the new folds will be about 1” to 1-1/8” away from the side edge of the mask.

Secure the 3D fold
Your mask should now have a boat shape. These dimensions result in a mask that has a flattish dome at the front of the mask. If you have a narrower face or prefer a pointier look, you can adjust the folds at this stage.
With practice, you can skip the pins/clips and simply fold up the flaps while at the sewing machine.

Stitch down the folds
Stitch a line parallel to the side edge of the mask, catching the folds in the process. Back-tack at the beginning and end.
Sometimes the presser foot doesn’t like going over the hump of the second fold and pushes it out of place. A skewer or chopstick can help you push the material under the presser foot to keep everything aligned.

Prepare the elastics
You can purchase pre-cut elastics with slide adjusters but I prepare my own as follows:
Cut 8½” lengths of ¼” elastic. (Two per mask.) Loop the center of the elastic over a twist tie folded in half. Insert the twist tie into a silicone adjuster and pull the elastic through.

Sew the sides of the mask
Slide about ¼” of the ends of your elastics in between the outer fabric and lining on the sides.
Stitch close to the edge, closing up the sides and securing the elastics at the same time.
Back-tack at beginning and end to secure.

Trim the threads to finish
You will end up with two parallel lines of stitching about 1” - 1⅛” apart on each side of the mask.
Trim threads to finish. All done!

Optional techniques
To ensure the lining fabric does not show on the outside of the mask, you can cut the outer fabric ⅛” taller and the lining fabric ⅛” shorter.
The outer fabric will be 7⅜” high, and the lining fabric will be 7⅛” for this pattern.

Optional techniques (cont.)
Sew the first horizontal seam with raw edges lined up with ¼” seam allowance.
Line up the raw edges on the opposite side. By pulling the edge of the shorter lining fabric to meet the edge of the outer fabric, you will create a bubble on the outer fabric.

Press the seams as sewn one side at a time, without putting a crease in the bubble.

Turn the mask RS out and finger press along each seam, with the seam allowances toward the lining.

Press the mask flat at the top and bottom.

The “extra” outer fabric will wrap over toward the lining side. The finished dimensions after pressing are the same as if you’d cut both fabrics the same size, since you took away from the lining what you added to the outer fabric.
Proceed with the remaining steps from here.